Content Change Alerts
Overview
The Content Change Alerts is a part of the Brand Content Monitoring submodule within the Digital Shelf Monitoring main module. This screen monitors and reports changes made to product pages on Amazon, like titles, descriptions, bullet points, images & videos etc.
Users can view detailed analytics and trends related to the content changes and keep the content standards consistent which helps in better user experience.
Users can view detailed analytics and trends related to the content changes and keep the content standards consistent which helps in better user experience.
How to View Content Change Alerts?
- Navigate to the Digital Shelf Monitoring > Brand Content Monitoring > Content Change Alerts.
- Select the required platform from the global switcher, which is set to Amazon by default.
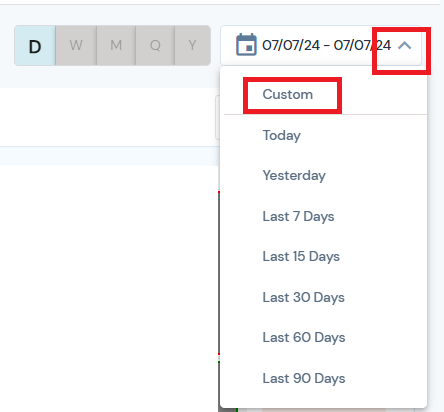
- Select the time range from the date drop-down menu, which is set to 'yesterday' by default.
- Click on the filter icon to set parameters for the data you want to view.
- Click on any of the content change cards to update the charts and table below with relevant data.
- Click on the Trusted Source Products widget to view and upload Trusted Source Data.
- View the count of content changes with 7-day trend in the Trend charts.
- View Trend chart on the right based on conformed, non-conformed and previous day status.
- Click on the Export icon to export the data in various formats like PNG, GPG, PDF, SVG, CSV and XLXS.
- Click on the Export Report button to export the .pdf of detailed reports.
Content Change Cards
The Content Change Alerts screen features five key content change cards that represents a specific content type:

- Title Changes: Changes found in the product title.
- Description Changes: Changes found in the product descriptions.
- Bullet Point Changes: Changes found in the product's bullet points.
- Image & Video Changes: Changes found with addition, removal and missing gallery images, alternate images and alterations in video count.
- Variation Changes: Changes found in product ID when product is removed, added or is unauthorized.
Each card shows the number of changes (count) detected, click on a card to update the data and charts below to reflect changes specific to the selected content type.
Trusted Source Products
The Trusted Source Products widget displays the number of trusted source products and total products. Trusted source products are those whose information is conformed by the user. For example, if the user provides the description they have posted for a product on Amazon, it is considered a conformed source product.
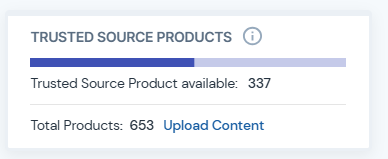
This widget also includes an option to upload content, allowing you to submit conformed information directly. You can upload conformed content via the Upload Content option in this widget.
This widget also includes an option to upload content, allowing you to submit conformed information directly. You can upload conformed content via the Upload Content option in this widget.
There are three upload scenarios to consider here:
Non-Third party integrated users:
- Click on Upload Content in the Trusted Source Products widget, this takes you to content tab in product center.
- Download the required template:
Platform latest data: is the latest scraped content data of the products, it is also the recent available data from the past scrapings if latest scraped data is unavailable.
Platform latest and locked data: is the latest available locked content data. - Conform the changes and upload it back to the PC.
 The order of data addition is first from locked data and then from the latest available data.
Blank template users:
- Click on upload content in the Trusted Source Products widget, this takes you to content tab in product center.
- Download the blank template.
- Fill in the details.
- Upload it to the product center by clicking upload button.
Third party integrated users:
We now allow access to content change
data directly from external sources without any manual intervention. This
eliminates the need for manual uploads and data locking, significantly
streamlining your workflow.
We currently integrate with DigiShare and are extending our capabilities to include Salsify, Syndigo, and other platforms you may choose. To get started with these integrations, simply request a setup process from our support team at support@i2oretail.com.
We currently integrate with DigiShare and are extending our capabilities to include Salsify, Syndigo, and other platforms you may choose. To get started with these integrations, simply request a setup process from our support team at support@i2oretail.com.
How to set and update content changes?
- Navigate to Product Center > content.
- Click on the grid icon to open product details.
- If the Trusted Source Available is 'No,' you can verify the product details and approve it by clicking on 'Set Trusted Content'.
- If the Trusted Source Available is 'Yes', click on Show Latest Content to load the pop-up with latest content data.
- If you do not wish to approve the latest loaded data, click on Cancel Trusted Content.
Charts and Graphs
Content Changes by Category/Brand
You can view this chart by either category or brand:
- View by Category: Displays bars for a named category with the number of content changes found in that specific category.
- View by Brand: Displays bars for a named brand with the number of content changes found in that specific brand.
1. Click on the switch button to select either category or brand.
2. Hover over the bar to get detailed information about the number of changes.
Daily Trend Chart
The Daily Trend Chart shows content changes for the selected period and is updated daily.
By default, the chart shows 7-days of data trend.
1. Click on the switch button to select view by option.
View the chart by following switches:
- All: Merges the conformed, non-conformed and previous day’s data to give you an aggregated view.
- Conforming: Shown in green to indicate that we have received the conformed data.
- Non-Conforming: Shown in red to indicate that no data is being conformed by the user.
- Previous Day: Shown in yellow to indicate that we have used previous day’s data in the chart.
2. Hover over the bar to get detailed information about the number of changes.
3. Export the trend chart in various formats such as PNG, PDF, XLSX, JPG, SVG, and CSV by clicking on the hamburger menu.
View Details Table
In the View Details section, the content change details are displayed in a tabular format at ASIN level. The table includes columns such as product details, reporting date and time,
Trusted source status, and more. You can customize these columns to display the information you need.
How to View ASIN Pop-Up in Content Change Alerts
Content Change History
1. Navigate to Digital Shelf Monitoring > Brand Content Monitoring > Content Change Alerts.
2. Scroll down to the View Details table.
Here the columns are named after the product attributes.
3. In
the "Content Changes" column, you will see the type of content
changes (e.g., title, description, images etc.) highlighted in red, yellow, or
green. These colors indicate whether the change is non-conforming (red), lacks
a trusted source (yellow), or is conforming (green).
- A yellow content change type: Indicates that the latest content change data doesn't match the previous scape content data.
- A red content change type: Indicates that the latest content change data doesn't match the trusted source products content data.
- A green content change type: Indicates that the latest content change data matches with the trusted source products content data.
 Click on the desired content change type in content changes
column to view details related to that specific content change type. This will
automatically apply filters in the product details pop-up and shows you quick
results.
Click on the desired content change type in content changes
column to view details related to that specific content change type. This will
automatically apply filters in the product details pop-up and shows you quick
results. 3. Content changes in the View Details table:
- Trusted
Source Available: Represents the availability of trusted source data
from the user.
- Product
Title: Represents if the heading of the product, on product display page
(PDP) on amazon is conformed, non-conformed or have taken from previous scrape.
- Reporting
Date & Time: Displays the exact date and time when the data was last
updated.
- Content
Changes: Indicates the specific types of changes made to the product's
content, such as title, description, or images. These changes are marked as
either conforming, non-conforming, or no trusted source.
- Customer
Rating: Represents the overall rating of the product based on customer
feedback on marketplace, usually out of 5 stars.
- Coupon
Available: Indicates whether there is an active coupon available for the
product.
- Coupon
amount: Specifies the value (in dollar or percentage) of the coupon that
can be applied to the product.
- Discount
%: Shows the percentage of the discount currently offered on the product.
- Deal Available: Displays whether there is a special deal or promotion on the product.
- Buy Box Price: This column gives the price of product in the buy box.
- Buy Box Winner: The name of the seller who won the buy box.
- Review Count: The total number of reviews received by the product.
- Inventory
(PDP): The current stock level of the product as shown on the product
detail page.
- Category: The category of the product.
- Brand: Name of the brand under which the product falls.
- Product Tags: Product lifecycle status such as new, active, end of life, next gen, out of print, unavailable, or discontinued.
- Parent product ID: The identifier for the parent product in a group of variations.
- Reporting Range: The period over which data is reported. Its daily and weekly.
- Top 50: Indicates weather or not the product is among the top 50 in its category.
- Model Number: Gives the unique identifier number for the product model.
- UPC: Universal Product Code used to identify the product.
- Replenishment
status: Gives you product availability status. The Replenishment
status directly impacts the product visibility on amazon and thus effects
its sales.
Replenishment status can have values like:
NP (New Product),
PR (Planned Replenishment),
BR (Basic Replenishment),
OS (over short),
NR (non-Replenishable) &
OB (Obsolete Replenishment)
The fields in the View Details table can be blank in case there is no change from yesterday and today for the products which do not have the trusted source.
Latest Scan Per Day
Latest scan is available in view details table as well as in the product details pop-up. The Latest Scan Per Day toggle refines the data in the View Details table by focusing on the most recent data collection within the selected date range.
Latest scan is available in view details table as well as in the product details pop-up. The Latest Scan Per Day toggle refines the data in the View Details table by focusing on the most recent data collection within the selected date range.
Example: If the product data is scraped 5 times a day over a
7-day period, the View Details table and the product details pop-up displays
all the changes across those 35 data points (5 scrapes per day for 7 days).
However, when you toggle on the Latest Scan feature, the table loads only the
most recent scrape for each day. In this case, the table shows the latest 7
changes, one per day.
3. Click on the Latest Scan Per Day toggle to control how the data is
displayed:
- If you select the calendar first and leave the Latest Scan toggle off, it shows the latest scrape data (updated hourly) for the selected dates.
- If the Latest Scan toggle is already on and you choose a different date range, it shows the latest data for the new time range.

For clients with single scrape, the toggle button will
not be visible.
4. Click on the grid icon with four squares in the View Details column.
- The Product Details pop-up window will display detailed information about the product, including its lock status, fundamental details, and content change specifics.
- Trusted Source Available: Indicates whether the trusted source data has been received (yes) or not (no).
- The Trusted Source Content is the authoritative and unchanged version of the content that the user has specified for display on product display page on amazon. The trusted source content is conformed and locked by the user.
- Product Image and Fundamental Details: Includes short name, marketplace, product code, etc.
5. Toggle
on Latest scan to load the latest content changes.
6. Click on the Filter icon to filter the data for your required parameters or use preset filters.
- Content change status and content change type are the two quick filters/presets present on the screen that can be used when required.
- The image
filter aggregates the primary image, alternate images, video thumbnails, and A+
content. When image changes are displayed in the table, only added, removed, or
altered images are shown. Unchanged images are not displayed.
7. Use the Date drop down option to select the time range. You can also select a custom date.
6. Content Change tab shows the content table with following columns:
- Content change type: It can be Title change, Image change, Browse note etc.
- Content change date and time: The time of content change.
- Alerts: A quick description of found changes.
- Trusted source/previous day content: Detailed description of the trusted source content or previous day content.
- Latest content: Latest drawn content.
- Content change status: Whether conforming, non-conforming or previous day.
7. Click on Column dropdown to select/deselect display columns.
8. Click on the download icon to download detailed content change report.
9. Trusted Source Content: The Trusted Source Content is the authoritative and unchanged version of the content that the user has specified for display on product display page on amazon. The trusted source content is conformed and locked by the user.

This tab shows the details of trusted source content such as:
- General Information: Includes details of product title, product description, bullet points and browse note.
- Images: Includes details of gallery image and alternate images.
- Videos: Includes details of video counts.
- Other information: Includes details such as product dimensions like length, breadth and weight.
In the absence of trusted content, we shall take latest available content.
10. Click on the cross mark to close this pop-up window.
Product Compliance Snapshot
1. Click on the Product Compliance Snapshot tab.
2. This
tab works like the Content Change History and shows the count of content statuses in the respective Content Change Type column.

The Product Compliance screen previously showed only the latest compliance data based on the most recent scrape, but it will now display compliance data according to the selected date range.
3. The
compliance data is displayed according to the selected date range:
- Single Scrape Per Day: For the selected date range the screen will show one compliance record per day, reflecting the compliance status at each daily scrape.
- Multiple Scrapes Per Day: For the selected date range the user will see multiple records per day.
Example: for a 7-day range with 3 scrapes/day, there will be 21 records.
4. In the default screen you will see View Details. Product
Details, Reporting Date & Time, Trusted Source Available and the content
changes columns like Title, Description, Bullet Point, Primary Image, Alternate
Image, Video Thumbnail, Video Count, A Plus & Browse Node.
5. To customize the display, click on the Column dropdown to
select the attributes you want to see on the main table screen.
6. The number displayed in the content change columns
reflects number of days a product has been in either a conforming, non-conforming,
or no trusted source state. The state is indicated by a corresponding
color code.
Status Count Calculation
Case 1: Single scrape per day
- If the product content status matches the
previous scan or the trusted source, the count starts at 0 and increases daily
as long as the status remains the same.
- When a status change (mismatch) occurs, the
count resets to 0.
Case 2: Multiple scrapes per day
- If the product content status matches the
previous scan or trusted source, the count starts at 0.
- The count does not increase for the day if the
subsequent scans also match the content status.
- The count increases the next day, provided the
content status remains unchanged.
- If the content status changes during any scan,
the count resets to 0.
7. Click
on Latest Scan to view the compliance status for the most recent scrape
of the day for the selected date range. This is set to show all records by
default.
8. Click on
the quick filters to filter the data for frequent use:
- Content Change Type filters products by content change type (e.g., title, description, bullet points).
- Content Change Status filters products by the content change status (e.g., Conforming, Non-Conforming, No Trusted Source).
Downloads
Downloads are available across the entire sales insights screen. Click on the download button to initiate the download of reports.
Frequently Asked Questions
How can I confirm product content?
Use the Trusted Source Products widget to upload confirmed content directly from your records.
What does the Product Lock Status indicate?
The Product Lock Status indicates whether the content has been confirmed (closed) or not (open).
How can I filter data for a specific period?
Use the filter icon to set custom date ranges or select from pre-defined options like weekly, monthly, or daily.
Can I customize the columns in the View Details table?
Yes, you can customize the columns by selecting or deselecting the ones you wish to view.
How do I export the data?
Click on the export icon available in the charts or tables and choose the desired format.
Related Articles
Exception Management
Exception Management is activated as part of i2o Digital Shelf Monitoring. Exception Management data allows ecommerce brands to monitor daily threats to product listings. This article explains the data available across the various Exception ...About Exception Management
Exception Management is activated as part of both i2o Growth Accelerator and i2o Brand Protector. Exception Management data allows ecommerce brands to monitor daily threats to product listings. This article explains the data available across the ...Glossary Of Terms & Metrics
# 1P: First Party, describes Amazon’s direct relationship with manufacturer brands and distributors that receive purchase orders from the retailer. Specific to Amazon's Vendor Central platform. 3P: Third-Party, describes sellers trading goods on ...How do I view the status of my support ticket?
Step 1: Log in to your i2o Application( https://app.i2oretail.com/ ) with your credentials and click on the icon to access the Help Desk dashboard Step 2: Click on the “Tickets” tab or “My Area” tab you see on your screen Step 3: You would be able to ...How To Make Bulk Changes
On the home page of the i2o Product Center, your Inputs Dashboard shows you where your products are active and inactive on the i2o Retail Advisor platform. You may review recently discovered products, recently updated products, and whether you’ve ...